Chain Condition – Is the blade on your chainsaw blunt?
How can you tell when a chain is blunt? There are two simple indicators that will tell you when your chain on your electric chainsaw or petrol chainsaw requires sharpening.
See the latest price on Amazon UK for this product here
First, the teeth on the chain are designed to cut by “biting” into the wood. Depth gauges, located in front of each tooth, regulate the size of this “bite” and determine how much wood is cut with each pass. A sharp chain will “self feed” and the teeth will cut as deep as the depth gauge will allow. You can feel this when you are cutting, you need to apply just a small amount of pressure and the chain will cut on its own. When chains are blunt, they do not “self feed” and you have to push the chain into the wood.
Second, sharp chains will cut large square type shaped chips. However, blunt chains that do not bite will cut small chips that resemble sawdust. If you are experiencing either or both of these symptoms your chain is blunt ! The most common complaint noted from inexperienced chainsaw users is “the saw will not cut” – in most instances this will be accompanied with the above two factors – because of the condition of the machines chain. Does this sound familiar? If it does you need to read on to find out how to sharpen a chainsaw blade….
There are two options to restore cutting performance back to your chainsaw, either replace the chain or sharpen it.
Chain Sharpening
Providing the chain on your saw has not stretched too much it is more cost effective to sharpen the chain as opposed to replacing it. For most users there are two options to getting the chain sharpened. Either take the chain to a saw sharpening company (a lot of garden machinery service agents offer this service) or sharpen it themselves with a sharpening kit.
Although using a chainsaw sharpening kit can be time consuming and tedious it really is cost effective when compared to the cost of buying a new one. Popular chainsaw sharpening kits can be freely purchased for a far lower price than a new chain. All that is required to correctly sharpen the chain on your saw is a pair of protective gloves for the operator and a chainsaw filing kit comprising of: A chainsaw file gauge, A round chainsaw file the same gauge as the chain on the saw, and a flat file to file the depth gauge on the teeth. ( to purchase click here )
Although not essential a small stiff brush (an old toothbrush is ideal) and a can of resin solvent would be beneficial in helping you maintain the chain and prolong its service life.
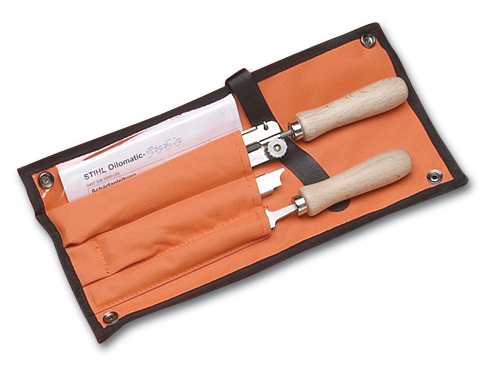
We found that one of the easiest and straight forward chainsaw sharpening kits to use was the one manufactured by Stihl.
Recommended Sharpening File and Kit For Chainsaws:
You check out the latest price on this one at Amazon here
Chainsaw File Gauge: This is used for checking the important side and top plate cutting angles on each tooth of the chain blade. It also checks the tooth cutter length and depth gauge setting. Several types also have shaped tools built into them to clean the groove and oil inlet hole in the saws chain bar.
Round Chainsaw File: This is used for the correct sharpening of the chain.
Flat Chainsaw File: This is used for filing the depth gauge on each tooth to the correct height and profile.
The brush is for cleaning all debris off the chain prior to sharpening, the resin solvent is a special spray which will dissolve resin on the chain whilst cleaning and lubricating it at the same time. ( to purchase click here )
When choosing a file gauge ensure it is the correct one for your make of chainsaw and chain type, many different brands and types are available but it is important that the angles marked on it are the correct ones for your particular chainsaw.
If you own a chainsaw and cannot find one dedicated to it the best option is to ask your local dealer for advice and if needed compare one with a new chain to check the angles are correct. The same applies to the round chainsaw file, consult your owners manual or local dealer to ensure you purchase the correct size. If you do not own either it would be beneficial to purchase a complete sharpening kit providing an off the shelf one is available for your chainsaw, this would include all files and the correct gauge. ( to purchase click here )
Sharpening the chain is a simple task, prior to commencing work please follow basic safety rules to protect you from injury: This may be obvious but the saw must not be not running ! Where possible only try to sharpen the saw with the engine cold on the chainsaw. Always wear protective gloves.
Sharpening the chain: Make sure the the chainsaw is on a sturdy, flat, well-lit surface. Wearing protective gloves so that you are not cut whilst handling the chain place a wooden block underneath the bar to keep the saw from moving. Next, ensure that the chain is properly tensioned. If it is too loose, the chain will move from side to side and you will not be able to file it correctly. However, if it is too tight you will not be able to pull it around the bar and sharpen the other teeth.
There are three steps to correctly sharpen each tooth:
The top plate requires filing to the correct angle (as marked on the gauge), The side plate requires filing to the correct angle (as marked on the gauge), The depth gauge located in front of the tooth requires filing to the correct size to give the correct “bite” when cutting. Finally the cutting angle’s and “working” corner of the tooth requires checking to make sure the cutting angles are consistent.
The top area of each tooth on the chain (where the side plate meets the top plate) is the part of the tooth that does most of the cutting. This is the area which you will need to sharpen (the “working” corner). Place the chainsaw file gauge (it will have an opening cut into it) over the first tooth to be sharpened, looking down on the top area of the gauge you will see the scribed or marked angle that the tooth needs to be sharpened to.
Place your round file against the tooth and align it with the gauge markings. Make sure the file is positioned so that it cuts when you stroke towards the outside of the tooth (the chainsaw file will only work in one direction). Keeping the file level with the alignment mark on the gauge push the file with a firm stroke against the tooth, you will notice resistance as the file is removing metal from the tooth and so sharpening it.
Release the pressure on the return stroke of the file and make another stroke. Repeat this process until you see a clean thin area on the tooth you are working on. This clean area is the new sharp area which will have restored the chain to a serviceable condition.
(1) File the top plate. This angle ranges from 25 to 35°, most guides have 30 to 35° angle scribed on them.
(2) File the side plate. Most chains have a side plate angle around 85°.
(3) Check the cutting angle and working corner. This angle should automatically form when you file the top plate and side plate. If correctly filed, your cutting angle will be consistent across the entire cutting edge. Usually this angle is around 60°.
File the chain until any nicks and damages are removed. Look at the corner of the cutting blades on the teeth. If you see a clean, thin chrome edge, the chain is sharp. Advance the chain to the next tooth. Sharpen all of the teeth on one side before you change the guide angle to work on the teeth on the other side.
While a sharp chain is your primary concern, you must maintain the other saw components to prolong the life of the saw. These components, when working properly, also ensure that your saw will perform trouble-free.